Quickstart
[ ]:
%matplotlib qt
import mindaffectBCI.online_bci
System Architecture
The system consists of 3 main components as illustrated here.
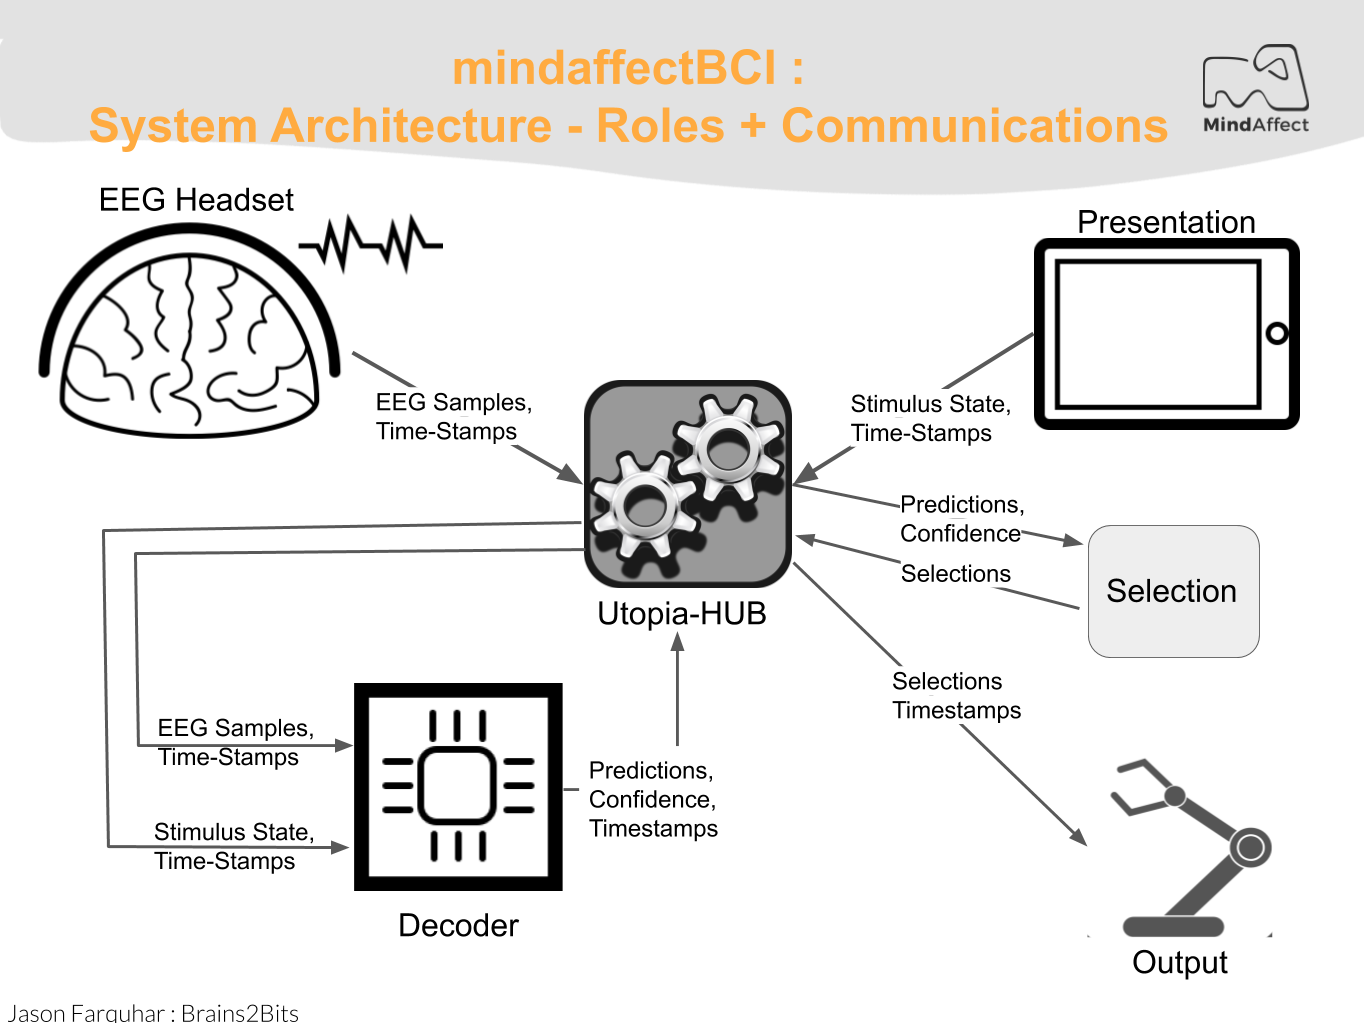
To actually run the BCI we need to start each of these components: - UtopiaHub: This component is the central server which coordinates all the other pieces, and saves the data for offline analysis
- Acquisition: This component talks to the EEG Headset and streams the data to the Hub
- Decoder: This component analysis the EEG data to fit the subject specific model and generate predictions
- Presentation: This component presents the User-Interface to the user, including any BCI specific stimuli which need to be presented. It also selects outputs when the BCI is sufficiently confident and generates the appropriate output
Before we launch the BCI to start these components: * Power on the OpenBCI Ganglion. (toggle on/off button)
Now, we load the configuration we would like to use from the configuration .json file.
[ ]:
# load the config-file to use.  Here we use the default noisetag config file:
config = mindaffectBCI.online_bci.load_config("noisetag_bci")
Then we can run this configuration, with the following command.
[ ]:
# N.B. uncomment the following to run with fakedata driver, if you don't have an amp connected
# config['acquisition']='fakedata'

mindaffectBCI.online_bci.run(**config)
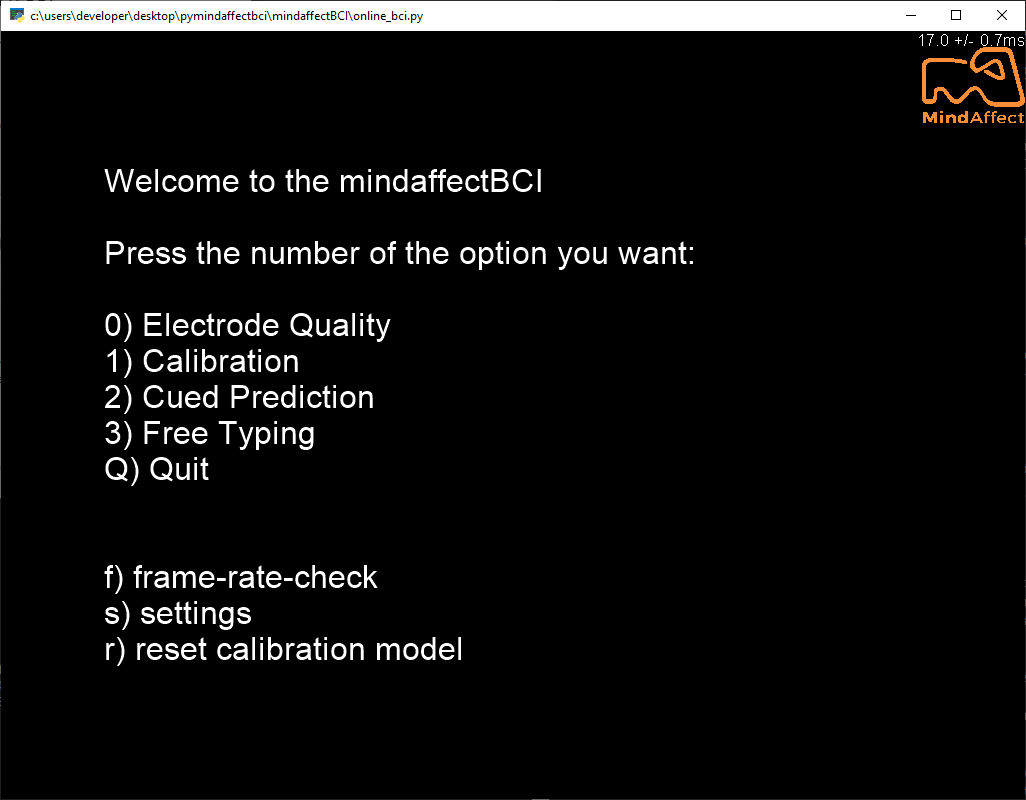
If this worked correctly you should see a screen like below. (Note: it may start minimized to check for a new python window in your task bar).
Using the MindAffect BCI
Now that the system is up and running, you can go through the following steps to use the BCI!
1. EEG headset Setup
Prepare a headset such that it follows the MindAffect headset layout.pdf in our Headset repository or prepare the headset delivered with your kit by following MindAffect headset setup.pdf
2. Signal Quality
Check the signal quality by pressing 0 in the main menu. You should see a screen which looks like this:
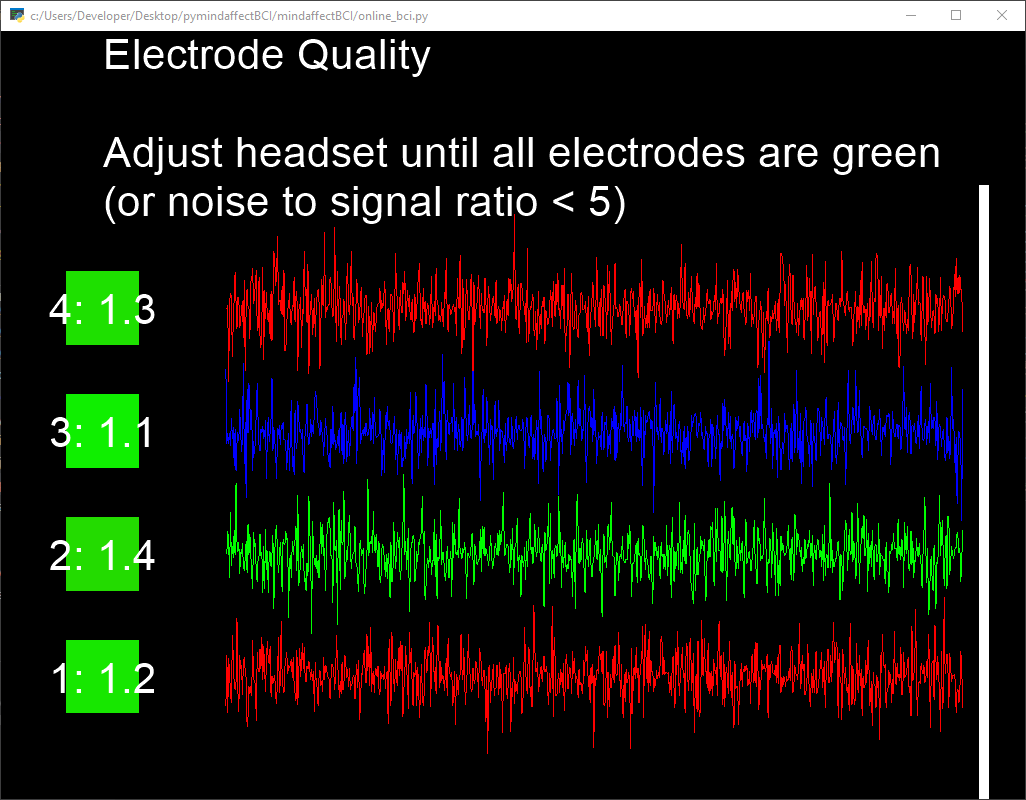
In this window you see a horizontial line for each channel showing the current live measurments. You also see a colored box at the left of each line with a number in it. The color of this box and the number indicate the current estimated noise-to-signal ratio for that channel. Ideally this number should be less than 5 and the box should be green.
It is critical for eventual BCI performance that the noise-to-signal ratio is as low as possible, and ideally less than 5.
Try to adjust the headset until all electrodes are green, or noise to signal ratio is below 5.
You can try to improve the signal for an electrode by pressing it firmly into your head. After releasing pressure, wait a few seconds to see if the signal improves. If not, remove the electrode, and apply more water to the sponge. The sponges should feel wet on your scalp.
If the noise to signal ratio does not improve by adjusting the headset, try to distance yourself from power outlets and other electronics.
3. Calibration
Start calibration by pressing 1 in the main menu. You should see an instruction screen telling you to look at the green cued button. Followed by a screen which looks like this:
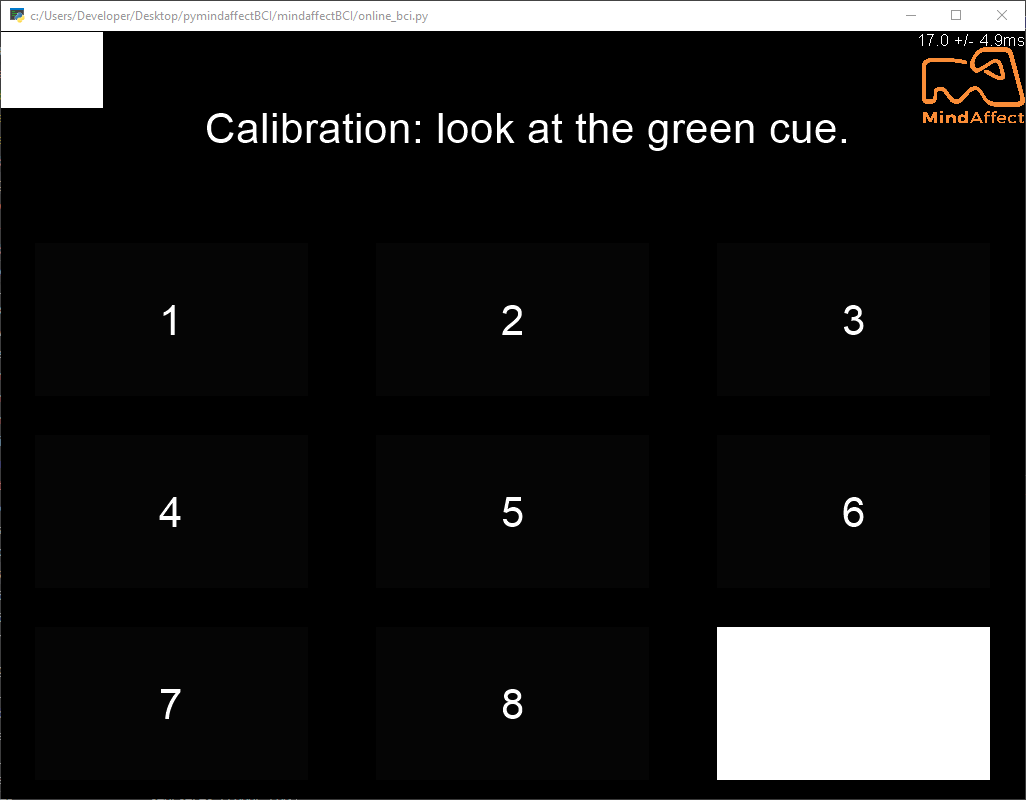
Do what it says, after 10 cues the stimulus will stop and after a few seconds you should see a ‘calibration performance’ screen like this:
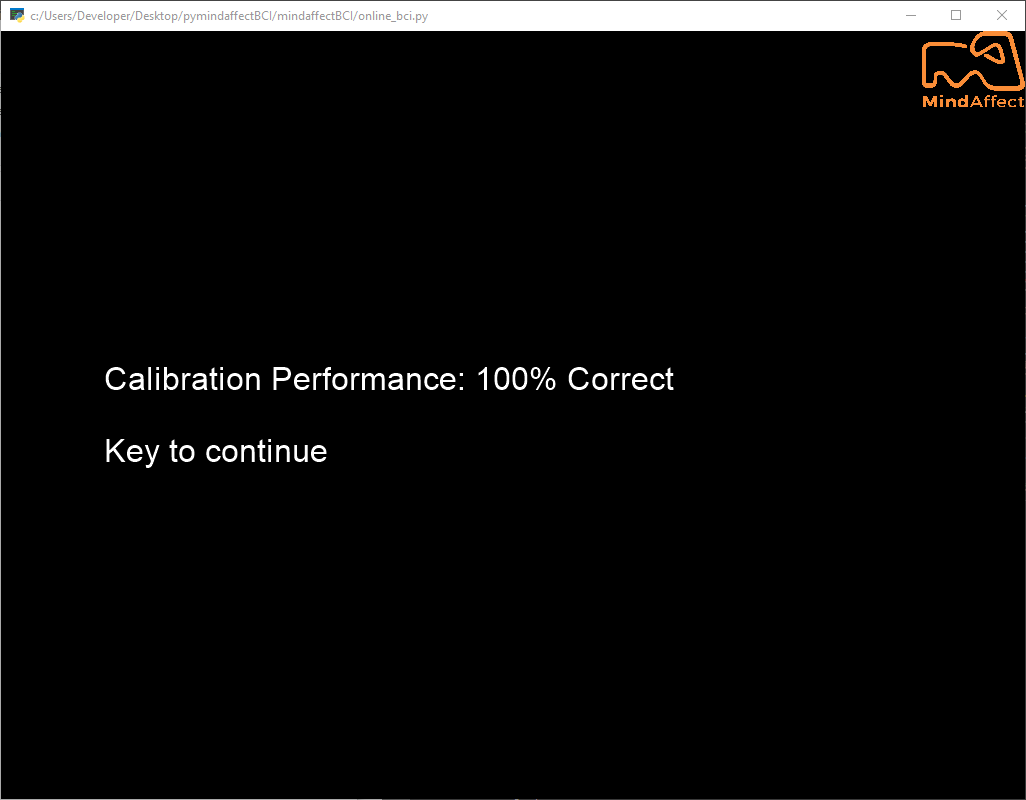
Hopefully, you got a similar performance level?
In addition you should see 3-windows pop-up showing more information about the performance. These windows are:
- Model and Performance:

This window shows (in left-to-right order). a) the fitted models spatial-filter – which shows the importance of each EEG channel, b) the models impulse response – which shows how the brain responds over time to the different types of stimulus event, and c) the decoding-performance – which shows how the accurately the model is able to decode the cued target with increasing data length, and the models estimate of it’s own accuracy.
- ERP (Event Related Potentional):
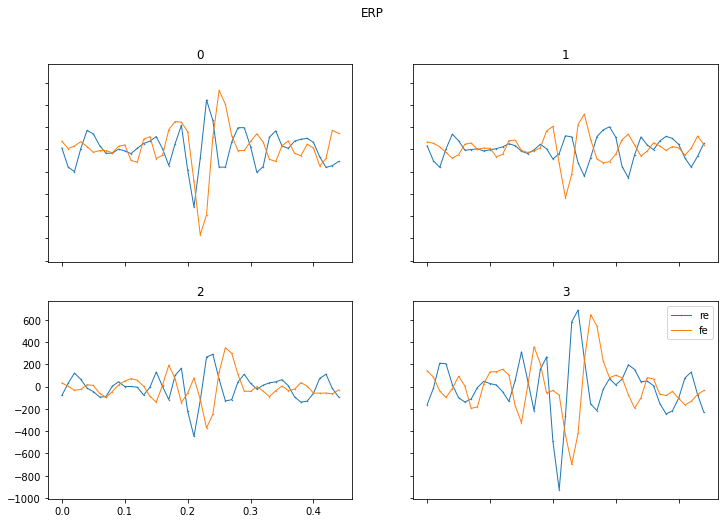
This window shows for each EEG channel the averaged measured response over time after the triggering stimulus. This is the conventional plot that you find in many neuroscientific publications.
- Summary Statistics:
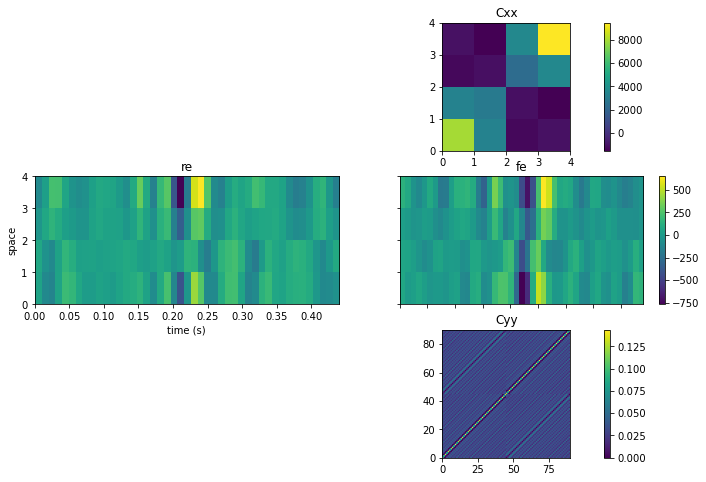
This window shows the summary statistics for the calibration data. This has vertically 3 sub-parts. a) Cxx : this is the spatial cross-correlation of the EEG channels. b) Cxy : this is the cross-correlation of the stimulus with the EEG. Which for discrete stimuli as used in this BCI is essentially another view of the ERP. c) Cyy : this is the temporal cross-correlation of the stimulus.
4. Brain Control.
If calibration worked well and you have good calibration performance, then you can proceed to brain-control. Press either 3 for cued prediction, where like calibration you are told where to look. Whilst not much fun, this is useful to get on-line datasets for training improved models. Or press 4 for free-spelling, where you can select what ‘button’ you want in an un-cued fashion.
In both cases, BCI feedback is shown in blue. Initially, while the system is unsure by changing the color of the central letter, and later when a selection has been made by making the whole button blue. Selected letters will be added to the spelling box at the top of the screen.
Struggling to get the system to work? Consult our FAQ section for info on how to improve calibration accuracy, prediction performance, and more!
Do you not want to run this notebook everytime when using the BCI?
Simply run it from your command prompt:
python3 -m mindaffectBCI.online_bci
Or specify your own configuration file and save location:
python3 -m mindaffectBCI.online_bci --config_file noisetag_bci --logdir .
5. SHUTDOWN
In the mainmenu, press 5 to shutdown the BCI.
[ ]:
# shutdown the background processes.
# N.B. only needed if shutdown from the main-menu window doesn't work.
mindaffectBCI.online_bci.shutdown()
Going Further
- Try other BCI types using our alternative configuration files.
- noisetag.json : example for a noise-tagging (or c-VEP) BCI (Default)
- rc5x5.json : example for a classic visual P300 odd-ball type BCI with row-column stimulus.
- ssvep.json : example for a classic steady-state-visual-response BCI.
- Write your own presentation system by following this guide (https://mindaffect-bci.readthedocs.io/en/latest/simple_presentation_tutorial.html)
- Write your own output system to make interesting things happen when a brain control is activated following this guide (https://mindaffect-bci.readthedocs.io/en/latest/simple_output_tutorial.html)
- Build your own BCI following this guide to develop your own compents. (https://mindaffect-bci.readthedocs.io/en/latest/first_run.html)
[ ]: