Installation
Requirements
Warning
Numpy version 1.19.4 does currently not work under Windows 10-2004.
Installation gives the following error:
RuntimeError: The current Numpy installation ('...\lib\\site-packages\\numpy\\__init__.py')
fails to pass a sanity check due to a bug in the windows runtime
If you are running into this issue, install numpy 1.19.3 manually:
pip install numpy==1.19.3
Recommended Setup
The MindAffect BCI can be used with various EEG acquisition and presentation devices and is therefore not limited to our recommended setup. It is however tested on the following supported hardware:
- Amplifier: OpenBCI Cyton
- Headset: The MindAffect Headset (Find the files to 3d print your own on our Github)
- Windows 10 machine
OS Optimization
For rapid visual stimulation BCI (like the MindAffect BCI), it is very important that the visual flicker is displayed accurately. From our testing we found that the following things help in improving timing accuracy:
- For windows 10: Disable full-screen optimization for your Python executable as explained here.
- For laptop users: make sure that your charger is plugged in and your machine is in power mode: Best performance (or a similar). How to change power mode.
- Set you screen to maximum brightness and disable Night Light, f.lux, or other applications that change the colour temperature of your screen.
Installing the package
- To install from source:
Clone or download the pymindaffectBCI repository:
git clone https://github.com/mindaffect/pymindaffectBCI
Install the necessary bits to your local python path:
change to the directory where you cloned the repository.
Add this module to the python path, and install dependencies:
pip install -e .
Note: The “.” after “-e” should be included in the command!
To install as a python library. (Note: installing from source is recommended as you can directly access the examples and configuration files.):
pip install --upgrade mindaffectBCI
Installation Check
As a quick check if the software has installed correctly into your python environment you can run:
python3 -m mindaffectBCI.online_bci --acquisition fakedata
Note: depending on the specifics of your python installation, you may have to ommit the 3 from the command:
python -m mindaffectBCI.online_bci --acquisition fakedata
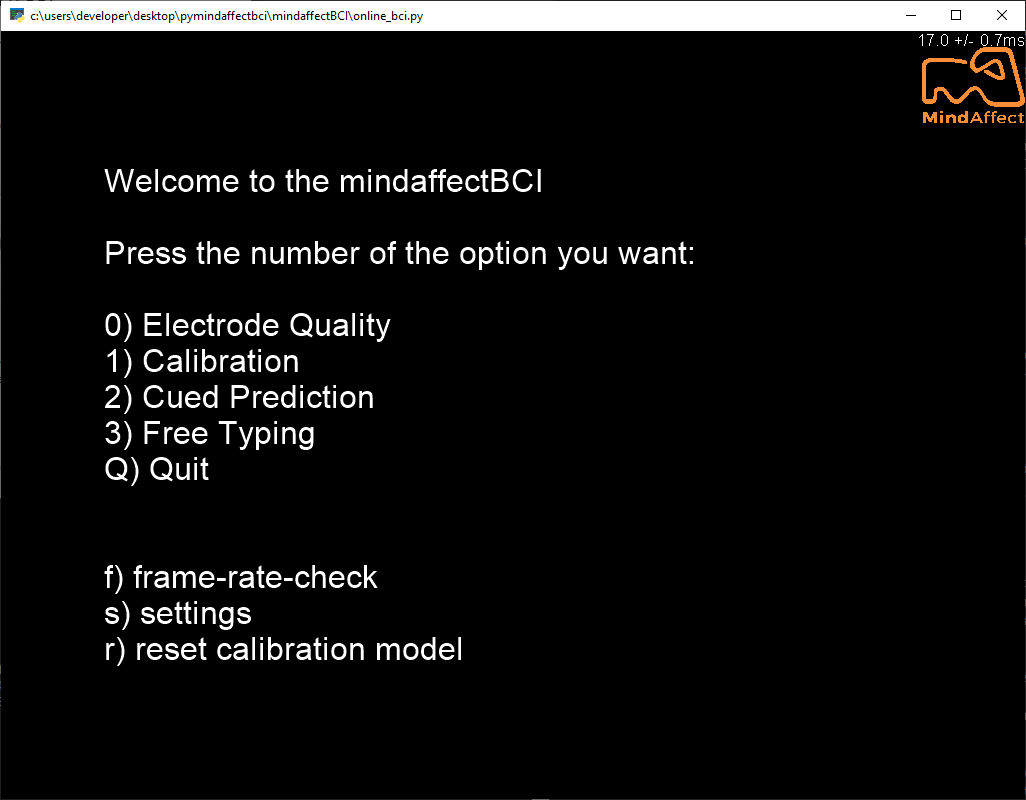
- If all is successfully installed then you should see a window like this open up::
- If you now press 2 you should see a flickering grid of “buttons” like below. You should see a random one briefly flash green (it’s the target) then rapidly flicker and eventually turn blue (to indicate it’s selected.)

If all this works then you have successfully installed the mindaffectBCI python software. You should now ensure your hardware (display, amplifier) is correctly configured before jumping into BCI control.
FrameRate Check
For rapid visual stimulation BCI (like the noisetagging BCI), it is very important that the visual flicker be displayed accurately. However, as the graphics performance of computers varies widely it is hard to know in advance if a particular configuration is accurate enough. To help with this we also provide a graphics performance checker, which will validate that your graphics system is correctly configured. You can run this with:
python3 -m mindaffectBCI.examples.presentation.framerate_check
or:
python -m mindaffectBCI.examples.presentation.framerate_check
As this runs it will show in a window your current graphics frame-rate and, more importantly, the variability in the frame times. For good BCI performance this jitter should be <1ms. If you see jitter greater than this you should probably adjust your graphics card settings. The most important setting to consider is to be sure that you have vsync turned-on. Many graphics cards turn this off by default, as it (in theory) gives higher frame rates for gaming. However, for our system, frame-rate is less important than exact timing, hence always turn vsync on for visual Brain-Compuber-Interfaces!
Amplifier configuration
In addition to configuring the software, you should ensure that your EEG hardware is correctly configured to optimise BCI performance. For the openBCI cyton and ganglion see this page Amplifier Setup: openBCI Cyton and Ganglion for how to configure these amplifiers and get the required COM-port information.