DIY Brain Computer Interfacing
This tutorial is a deeper dive into the mindaffectBCI, which shows you how to manually start each of the components individually. Before running this tutorial you should have read how an evoked bci works to get an overview of how this BCI works, and run through quickstart tutorial to quickly test your installation and try the BCI.
After following this tutorial, you will be able to; * configure the BCI startup to your needs, and * know how to replace any of the main components with your own version.
[ ]:
# Import the mindaffectBCI decoder and other required modules.
%load_ext autoreload
%autoreload 2
import mindaffectBCI.online_bci
System Architecture
The basic architecture of a mindaffectBCI is illustrated here. 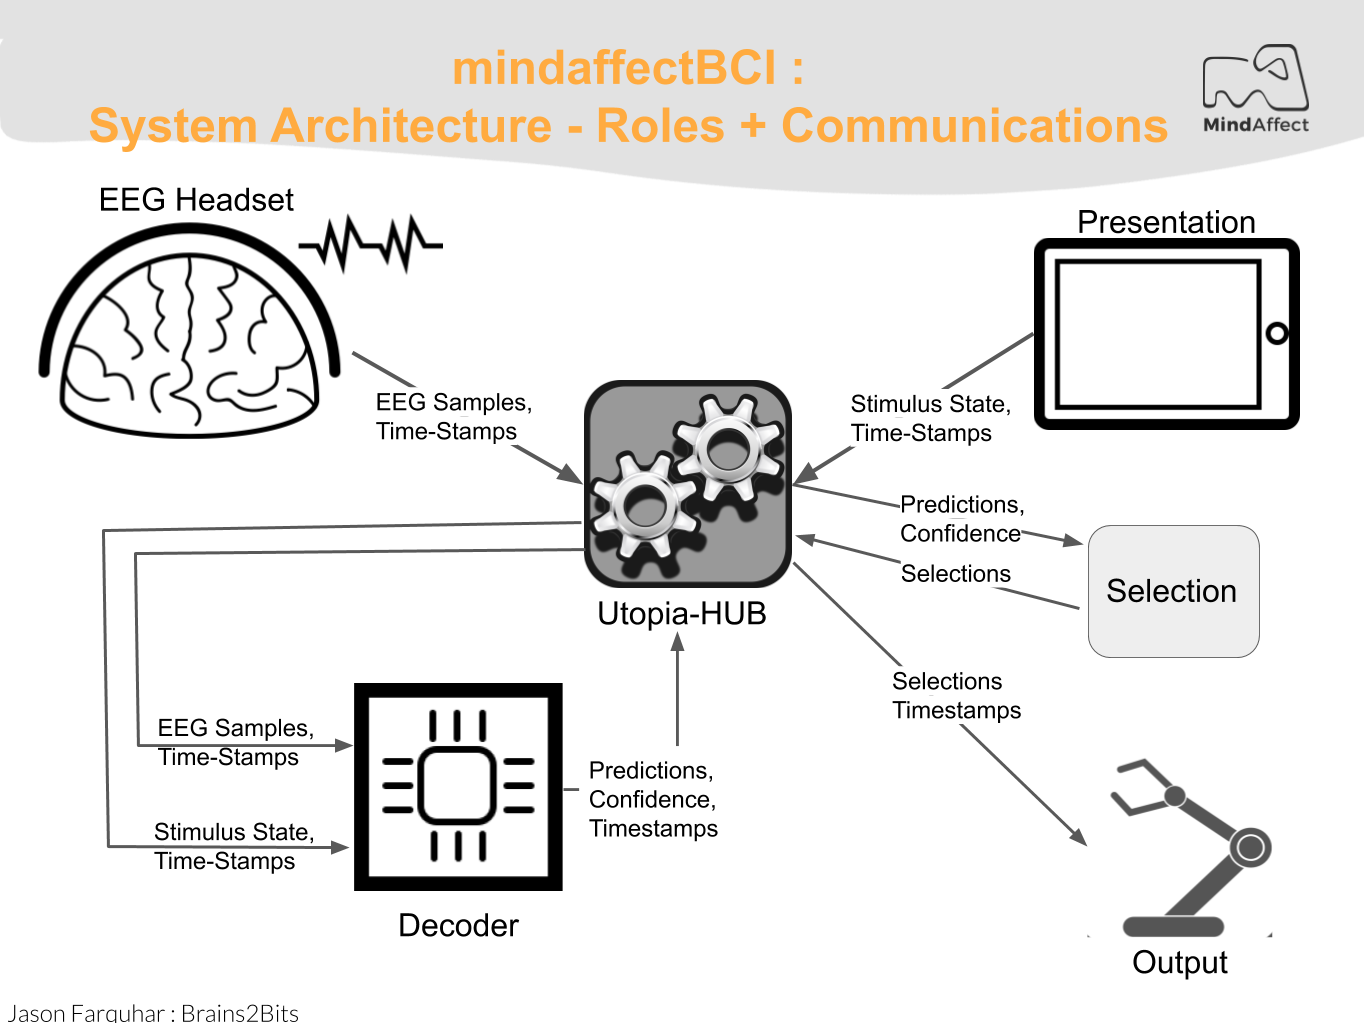
To actually run the BCI we need to start each of these components: - UtopiaHub: This component is the central server which coordinates all the other pieces, and saves the data for offline analysis
- Acquisition: This component talks to the EEG Headset and streams the data to the Hub
- Decoder: This component analysis the EEG data to fit the subject specific model and generate predictions
- Presentation: This component presents the User-Interface to the user, including any BCI specific stimuli which need to be presented. It also selects outputs when the BCI is sufficiently confident and generates the appropriate output
First, we start the UtopiaHub by running the following code block:
[ ]:
#--------------------------- HUB ------------------------------
# start the utopia-hub process
hub_process = mindaffectBCI.online_bci.startHubProcess()
ACQUISITION
Now that the hub is running we want to establish a connection between the amplifier and the hub to stream the EEG data. To achieve this the Brainflow library is used. The brainflow driver has to be initialized with input parameters that depend on the amplifier in use: (Consult the Brainflow docs for a complete list of amplifiers supported by brainflow but currently untested with the MindAffect BCI.)
| Board | board_id |
serial_port |
ip_address |
ip_port |
|---|---|---|---|---|
| Ganglion | 1 | dongle serial port(COM3, /dev/ttyUSB0…) | ||
| Ganglion + WiFi Shield | 4 | WIFI Shield IP(default 192.168.4.1) | any local port which is free | |
| Cyton | 0 | dongle serial port(COM3, /dev/ttyUSB0…) | ||
| Cyton + Wifi Shield | 5 | WIFI Shield IP(default 192.168.4.1) | any local port which is free |
When using either the OpenBCI Ganglion or Cyton with an USB-dongle we have to pass the serial_port argument, to find the serial port in use by your amplifier follow the following instructions:
On Mac:
Open a Terminal session
Type:
ls /dev/cu.*, and look for something like/dev/cu.usbmodem1(or similar):$ ls /dev/cu.* /dev/cu.Bluetooth-Modem /dev/cu.iPhone-WirelessiAP /dev/cu.Bluetooth-PDA-Sync /dev/cu.usbserial /dev/cu.usbmodem1
Then,
serial_portshould be defined as"serial_port":"dev/cu.your_com_name"
On Windows:
- Open Device Manager and unfold Ports(COM&LPT), the com port number is shown behind your used bluetooth adapter.
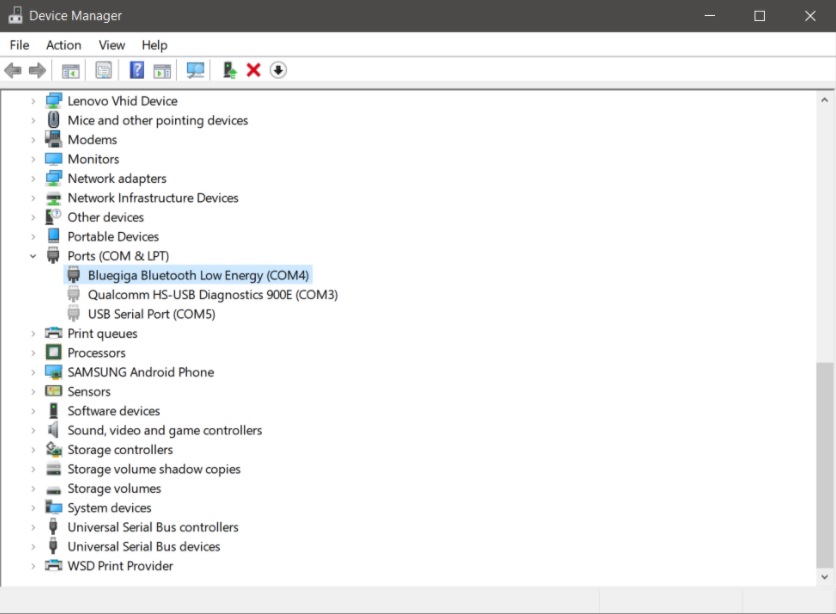 Then,
Then, serial_portshould be defined as"serial_port":"COM_X_"
The code below shows the acq_args for the Ganglion, change the arguments for the board in use and run the code block to start the acquisition process.
[ ]:
# start the ganglion acquisition process
# Using brainflow for the acquisition driver.
#  so change the board_id and other args to use other boards
acq_args =dict(board_id=1, serial_port='com4') # connect to the ganglion
acq_process = mindaffectBCI.online_bci.startacquisitionProcess('brainflow', acq_args)
N.B. Only use this cell if you just want to test with a fake eeg stream
[ ]:
# start a fake-data stream
# with 4-channels running at 200Hz
acq_args=dict(host='localhost', nch=4, fs=200)
acq_process = mindaffectBCI.online_bci.startacquisitionProcess('fakedata', acq_args)
DECODER
The decoder is the core of the BCI as it takes in the raw EEG and stimulus information and generates predictions about which stimulus the user is attending to. Generating these predictions relies on signal processing and machine learning techniques to learn the best decoding parameters for each user. However, ensuring best performance means the settings for the decoder should be appropriate for the particular BCI being used. The default decoder parameters are shown in the code below, and are setup for a noisetagging BCI.
[ ]:
# start the decoder process, wih default args for noise-tagging
decoder_args = dict(
        stopband=((45,65),(3,25,'bandpass')),  # frequency filter parameters
        out_fs=100,  # sample rate after pre-processing
        evtlabs=("re","fe"),  # use rising-edge and falling-edge as brain response triggers
        tau_ms=450, # use 450ms as the brain response duration
        calplots=True, # make the end-of-calibration model plots
        predplots=False # don't make plots during prediction
    )
decoder_process = mindaffectBCI.online_bci.startDecoderProcess('decoder', decoder_args)
The key parameters here are:
stopband: this is a temporal filter which is applied as a pre-processing step to the incoming data. This is important to remove external noise so the decoder can focus on the target brain signals.
Here the filter is specified as a list of band stop filters, which specify which signal frequencies should be suppressed, (where, in classic python fashion -1 indicates the max-possible frequency). Thus, in this example all frequencies below 3Hz and above 25Hz are removed.
out_fs: this specifies the post-filtering sampling rate of the data. This reduces the amount of data which will be processed by the rest of the decoder. Thus, in this example after filtering the data is re-sampled to 80Hz. (Note: to avoid ` <>`__ out_fs should be greater than 2x the maximum frequency passed by the stop-band).evtlabs: this specifies the stimulus properties (or event labels) the decoder will try to predict from the brain responses. The input to the decoder (and the brain) is the raw-stimulus intensity (i.e. it’s brightness, or loudness). However, depending on the task the user is performing, the brain may not respond directly to the brightness, but some other property of the stimulus.
For example, in the classic P300 ‘odd-ball’ BCI, the brain responds not to the raw intensity, but to the start of surprising stimuli. The design of the P300 matrix-speller BCI means this response happens when the user’s chosen output ‘flashes’, or gets bright. Thus, in the P300 BCI the brain responds to the rising-edge of the stimulus intensity.
Knowing exactly what stimulus property the brain is responding to is a well studied neuroscientific research question, with examples including, stimulus-onset (a.k.a. rising-edge, or ‘re’), stimulus-offset (a.k.a. falling-edge, or ‘fe’), stimulus intensity (‘flash’), stimulus-duration etc. Getting the right stimulus-coding is critical for BCI performance, see `stim2event.py <mindaffectBCI/decoder/stim2event.py>`__ for more information on supported event types.
tau_ms: this specifies the maximum duration of the expected brain response to a triggering event in milliseconds. As with the trigger type, the length of the brian response to a triggering event depends on the type of response expected. For example for the P300 the response is between 300 and 600 ms after the trigger, whereas for a VEP the response is between 100 and 400 ms.
Ideally, the response window should be as small as possible, so the learning system only gets the brain response, and not a lot of non-response containing noise which could lead the machine learning component to overfitt.
PRESENTATION
Before launching the presentation component we first make sure that the Hub, Acquisition, and Decoder components are running:
[ ]:
# check all is running?
print("Hub running {}".format(hub_process.poll() is None))
print("Acquisition running {}".format(acq_process.is_alive()))
print("Decoder running {}".format(decoder_process.is_alive()))
print("Everything running? {}".format(mindaffectBCI.online_bci.check_is_running(hub_process,acq_process,decoder_process)))
If not, try running the corresponding codeblock of the inactive component before continuing.
Creating the Stimulus
By default we use the MindAffect NoiseTagging style stimulus with a 25-symbol letter matrix for presentation. You can easily try different types of stimulus and selection matrices by modifying the symbols and stimfilearguments. Where: * symbols : can either by a list-of-lists of the actual text to show, for example for a 2x2 grid of sentences:
[ ]:
symbols=[["I'm happy","I'm sad"], ["I want to play","I want to sleep"]],
or a file from which to load the set of symbols as a comma-separated list of strings like the file symbols.txt.
[ ]:
symbols="symbols.txt"
- stimfile : is a file which contains the stimulus-code to display. This can either be a text-file with a matrix specified with a white-space separated line per output or a png with the stimulus with outputs in ‘x’ and time in ‘y’. This is what the codebook for the noisetag looks like where symbols are left to right and time is top to bottom.

Using Images as Stimuli
We also support the use of images as stimuli as shown by the robot_control.txt file. Simply specify the relative paths of the images you want to use as stimuli in a .txt file, or directly in a list-of-list as shown above.
Running the Stimulus
The UI with the desired presentation stimuli can be launched by running the code below. ### Note: the stimulus window my appear minimized, so check your task-bar!
[ ]:
# run the presentation, with our matrix and default parameters for a noise tag
from mindaffectBCI.examples.presentation import selectionMatrix
selectionMatrix.run(symbols=symbols, stimfile="mgold_65_6532_psk_60hz.png")
Now that the system is up and running, you can go through the following steps to use the BCI!
EEG headset Setup
Prepare a headset such that it follows the MindAffect headset layout.pdf in our Headset repository or prepare the headset delivered with your kit by following MindAffect headset setup.pdf
Signal Quality
Check the signal quality by pressing 0 in the main menu. Try to adjust the headset until all electrodes are green, or noise to signal ratio is below 5. You can try to improve the signal for an electrode by pressing it firmly into your head. After releasing pressure, wait a few seconds to see if the signal improves. If not, remove the electrode, and apply more water to the sponge. The sponges should feel wet on your scalp. If the noise to signal ratio does not improve by adjusting the headset, try to distance yourself from power outlets and other electronics.
Calibration
Start calibration by pressing 1 in the main menu. Continue to follow the on-screen instructions.
Feedback
You are now ready to try out the BCI by either selecting Copy-spelling (2) or Free-spelling (1)!
Struggling to get the system to work? Consult our FAQ section for info on how to improve calibration accuracy, prediction performance, and more!
SHUTDOWN
At this point, even though the presentation has completed, the background processes which run the hub, acquisation and decoder are still running. To ensure they are stopped cleanly it is always a good idea to shut them down correctly, as follows:
[ ]:
# shutdown the background processes
# N.B. only needed if something went wrong..
mindaffectBCI.online_bci.shutdown(hub_process, acq_process, decoder_process)
Alternative: Run all components with 1 command
If you just want to quickly run the decoding part of the BCI without presentation/output, using a pre-defined configuration you can do that easily by. 1. loading a configuration file 2. running the BCI This is demonstrated here.
[ ]:
config = mindaffectBCI.online_bci.load_config('noisetag_bci')
# uncomment this line to use fakedata
#config['acquisition']='fakedata'
mindaffectBCI.online_bci.run(**config)
Do you not want to run this whole notebook everytime when using the BCI?
Simply run it from your command prompt:
python3 -m mindaffectBCI.online_bci
Or with a JSON configuration file:
python3 -m mindaffectBCI.online_bci --config_file noisetag_bci.json
Going Further
- Try other BCI types using our alternative configuration files.
- noisetag.json : example for a noise-tagging (or c-VEP) BCI (Default)
- rc5x5.json : example for a classic visual P300 odd-ball type BCI with row-column stimulus.
- ssvep.json : example for a classic steady-state-visual-response BCI.
- Write your own presentation system by following this guide (https://mindaffect-bci.readthedocs.io/en/latest/simple_presentation_tutorial.html)
- Write your own output system to make interesting things happen when a brain control is activated following this guide (https://mindaffect-bci.readthedocs.io/en/latest/simple_output_tutorial.html)
- Build your own BCI following this guide to develop your own compents. (https://mindaffect-bci.readthedocs.io/en/latest/first_run.html)
[ ]:
[ ]: